DIY: Pearl Earrings With Rhinestones

Return to Roots: Creating Biwa Pearl Earrings
Before I immersed myself in the world of DIY and interior decoration, my passion was creating jewelry! I used to spend hours crafting unique pieces that could enhance any outfit. And although my heart now beats faster at the sight of exceptional interior decorations, I still have that spark for jewelry making. Today, I'm excited to share with you one of my favorite techniques – creating Biwa pearl earrings.
Biwa Pearl Earrings: Elegance for Any Occasion
Earrings are a timeless piece of jewelry that suits any occasion – from weddings to proms to everyday outfits. Biwa pearls have become extremely popular due to their unique and elegant design. These earrings are made from freshwater pearls, which have an elongated shape and distinctive texture, setting them apart from other pearls.
Biwa pearls come in various colors, from white and pink to darker shades like black and blue. They are also relatively affordable compared to other types of pearls, making them an excellent choice for those on a budget.
How to Create Your Own Biwa Pearl Earrings
Creating your own Biwa pearl earrings allows you to personalize your jewelry collection and add a touch of creativity to your style. Here’s a step-by-step guide on how to make your own Biwa pearl earrings using zirconia and Milliput clay.
Materials Needed for Making Biwa Pearl Earrings
To create your Biwa pearl earrings, you will need the following materials:
Biwa Pearls – These can be purchased online for a few pounds. Their irregular shape allows for the creation of unique jewelry pieces.
Zirconia – For extra sparkle.
Milliput Clay – For modeling and securing the elements.
Earring Hooks – So you can wear your creation.
Jewelry Wires – For connecting the elements.
Two-Part Epoxy Adhesive – To keep everything in place.
Summary
Creating Biwa pearl earrings is a great way to add elegance to your jewelry collection. It not only allows for personalization but also lets you experience the joy of creating something with your own hands. I hope this tutorial inspires you to try your hand at jewelry making and add a bit of creativity to your style.
I invite you to watch the video below, where you'll find the full tutorial and see how easy it is to create these beautiful earrings.

You will need:
Marker - use a permanent marker to mark the spots where you will drill the pearls.
Mini rotary tool - this is the most expensive item needed for this project. I use a Dremel, but you can also use a Ferrex, which I bought for around £20 with all of the equipment. It was a great deal.
Toothpick or needle - something with a thin end to help clean the drilled holes in the pearls.
Cotton pad, balls, or just cotton - for thorough cleaning.
Nail polish remover or other alcohol cleaners - after drilling, you need to remove all dust and prepare the pearls for epoxy.
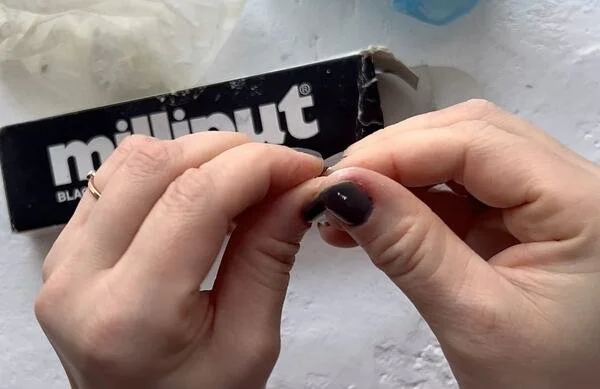
Milliput epoxy (white) - I have shown a box of black, but I used white. You can purchase it online for £3-4.
Flat board or something similar to work on.
Wax rhinestone pencil or other applicators - there are many rhinestone applicators available. I use my old one with wax, which still works well.
Clay sculpting tools - you do not need to buy a whole set of tools, but they are useful for future projects. You can use other tools like a small knife or needle.
Candle and lighter (if using a wax rhinestone applicator).
Pointed back rhinestones (cannot be flat) - you can buy these online in various sizes. I used size SS3, and a pack of 1440 pieces costs around £10-12.
Bowl of water - to keep the pearls wet while drilling.
Jewelry elements - studs and connectors. You can purchase flat studs so that you do not have to make any holes, or you can use studs with a pin fit.
Brush for coloring dry epoxy.
Eye shadow palettes or mica powder for coloring dry epoxy.
Strong glue - I use 2-component adhesive epoxy UHU glue.
Piece of transparent foil or paper - to mix the glue.
Pliers (optional for shortening studs) - if you use flat studs or studs with a pin fit, you do not need to use pliers.

Now, let's begin with marking the places where the rhinestones will be placed.

Next, using the mini rotary tool, you need to remove a bit of the top layer of the pearl.
Then, clean the drilled holes from any debris using a toothpick, cotton ball or pad, and alcohol cleaner.

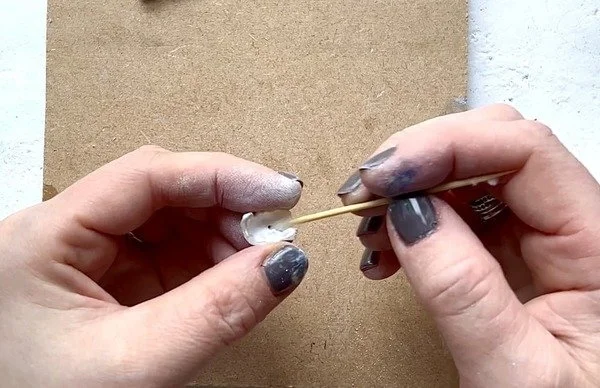
Using Milliput epoxy , fill in the cavities in the pearl. You can use sculpture tools or something else.


Using a wax rhinestone pencil or other applicators, start applying rhinestones onto the Milliput putty.


After placing the rhinestones, remove excess Milliput with water and a toothpick.


Repeat all the steps with a small pearl.


Make a hole for a connector.

The next step is to add a stud. If the hole is too small, you can make it deeper by using a mini rotary tool or you can cut off part of the stud.


Using a strong glue, connect the stud and the connector to the pearl.


Using the brush and eye shadow pallet color all visible white epoxy. Match the color to the pearls.

Connect two pearls together.
