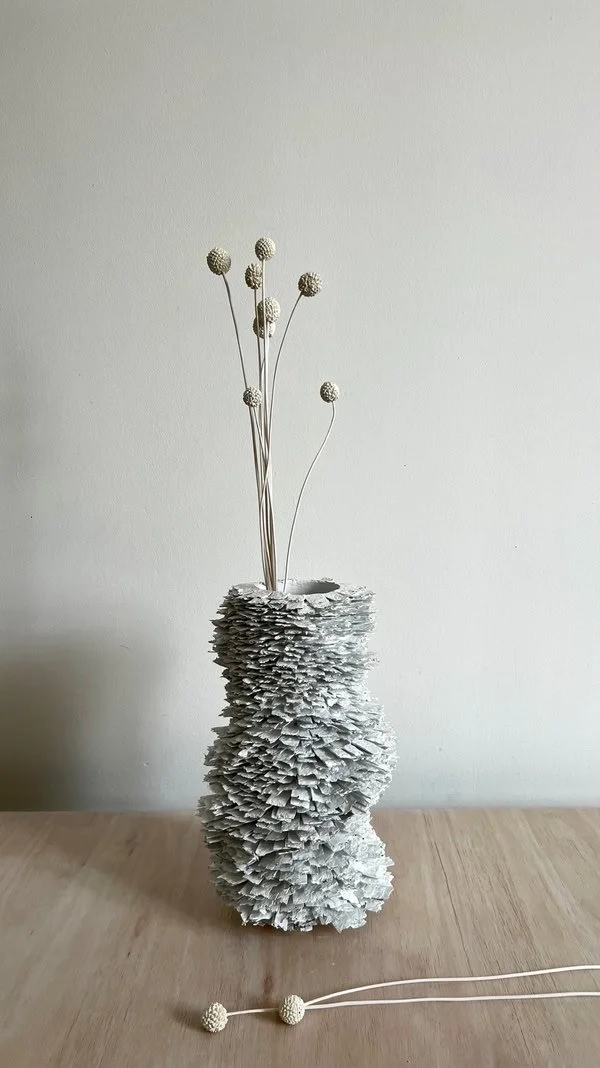
DIY: Paper Vase Tutorial. Creating Porcelain-Like Imitation
Joy of experimenting
Today, I'd like to share with you one of my favorite DIY projects, which allows you to use ordinary paper in a completely new way. I really enjoy experimenting with various materials, and lately, I came up with an idea that fascinated me - creating spatial shapes from paper pulp. I was inspired by an open pine cone - this natural shape seemed perfect for transferring into the world of interior decoration!
Creating the basic structure
We start with the basics - paper pulp. I spread it out on a flat surface, allowing thin layers to form, and then wait for it to dry solidly. Then, it's just a matter of gently cutting it into smaller pieces and painting them white. These pieces will be the basic elements for building our spatial structure, reminiscent of an open pine cone!
The minimalist charm of simplicity
Why does minimalist design attract me so much? Because I believe less is more! This paper vase, despite its simplicity, can add elegance and tranquility to any interior. Its white color and geometric shape make it blend perfectly into various arrangements, while still serving as a subtle focal point.
Creative experimentation
Although today we're focusing on a minimalist white design, there are no limits when it comes to colors or patterns! You can unleash your imagination and decorate the vase with your favorite colors, giving it a personal touch. It's the perfect opportunity to express your creativity and create something truly unique!
Inspiration for the future
Creating a paper vase is just the beginning! The techniques we've used can serve as a basis for future projects. We can use them to create 3D artworks, decorate frames, or even create abstract compositions on the wall. The elements themselves can be in various fanciful shapes. This paper adventure can take us further than we expect!
Express yourself through creative projects!
With simple materials and a bit of creativity, we can create something special that adds character to our interior. Whether you prefer minimalist interiors or colorful compositions, this paper play offers endless possibilities to make your home an even more personal and cozy place. So, let's get started!
You will need:
Paper pulp
Paper
Transparent film
Knife
Pencil
Rolling pin
Scissors
Paintbrush
Paint
Boxes or jar lids for joint filler, glue, and paint
Gloves
Cardboard tube or other box for construction
Sandpaper
PVA glue
Joint filler
Optionally, for later stages of gluing: large box and flat board or strip
We begin the project by spreading the paper pulp. I sketched rectangles of various widths, ranging from 4 to 10 cm. I placed a sheet of plastic wrap on a piece of transparent film - similar to the one used for wrapping bouquets. Then, I applied a layer of paper pulp followed by another piece of plastic film. I used a regular rolling pin to spread it out. We leave the whole thing to dry.
Next, we cut all the large paper elements into strips, and then we cut those strips in half.
We paint each element white.
For the construction, I used a sturdy cardboard box from alcohol. Of course, you can use something completely different, but remember, the structure must be stable because we'll be using joint filler, which is quite heavy. So, the entire construction must be very durable.
We lightly sand the box with sandpaper, then cover it with paper to create texture and irregularities.
I used joint filler to glue the elements together.
At some point, you may find it difficult to glue the elements. I used a metal strip and a box to secure the elements at the bottom so they wouldn't break.


